
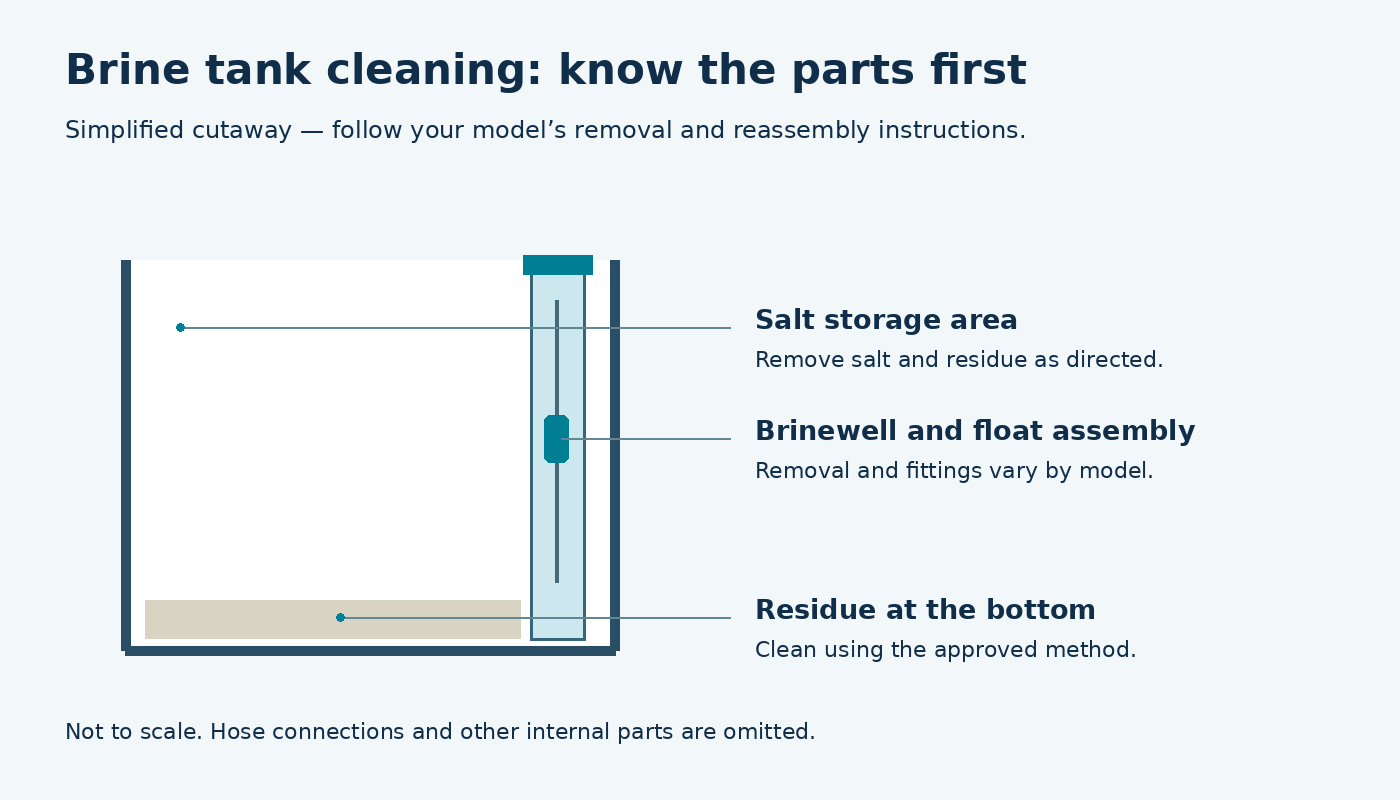
To clean a water softener brine tank, remove the salt and residue, clean the accessible surfaces using the manufacturer’s method, reassemble the parts, and refill as directed. Read the complete procedure for your model first: bypass steps, removable components, cleaning products, and refill quantities differ. This guide helps you prepare and understand the work without substituting another brand’s instructions for your own.
The brine tank is the salt-storage container. Cleaning it is a different task from cleaning the resin, servicing an injector, or sanitizing the system.
For treatment products rather than a tank cleanout, see when a water softener cleaner is appropriate and check the product and model instructions.
Diagram above: Simplified cutaway. Parts, fittings, and cleaning procedures vary by model.
Does your brine tank need cleaning?
Look for accumulated residue or sludge and check the maintenance schedule in your manual. Culligan describes salt mushing as buildup at the bottom that can interfere with brine production or withdrawal. Correcting it may require removing the material and cleaning the tank. A tank that looks dirty is worth inspecting, but an unusually high water level or poor softening can also have other causes. [1]
If you see discoloration, use the brown-water troubleshooting guide to distinguish color inside the brine tank from color at the taps before deciding whether tank cleaning addresses the problem.
Do not assume every salt bridge requires a full cleanout. Rheem notes that cleaning may be needed after a bridge or a prolonged absence, while its procedure treats hardened salt before removal. Decide what maintenance is needed from the observed condition and the model’s guidance. [2]
Before you start
Locate the model number and read the cleaning instructions all the way through, including the restart. Photograph the tank, fittings, and any parts you are authorized to remove. Keep small hardware together and leave enough room to work without pulling on tubing.
| Prepare | Purpose |
|---|---|
| Owner’s manual and model number | Confirm the correct isolation, cleaning, and refill procedure |
| Clean containers and an appropriate scoop | Handle removed material in manageable amounts |
| Cloths and the specified cleaning tools | Clean surfaces without improvising abrasive methods |
| Approved replacement salt | Refill after the tank is reassembled |
| A plan for removed salt and liquid | Check applicable disposal guidance before starting |
Equipment can contain substantial wet material. Avoid lifting a loaded tank. If access is difficult or the procedure involves connections you cannot identify, arrange service before beginning.
Documented cleaning methods are not interchangeable
| Documentation | Authorized parts / cleaning | Water refill and restart limit |
|---|---|---|
| Rheem salt-tank and brinewell support | Screw/wingnut brinewell and float; wipe with damp cloth. | 3 US gallons before salt. The article does not specify a universal recharge command. |
| Whirlpool support: illustrated tank styles | Removal differs for clipped versus screw-mounted parts; damp wipe. Match the pictured style. | 3 US gallons; reconnect the documented fittings and check for leaks as directed. |
| Culligan HE, models from 2021 | Manual, p. 21: brine valve/chamber and salt plate; tank rinse and mild soap for the plate. | 4–6 inches of water, not a fixed three-gallon instruction. Use its return-to-service instructions. |
These are procedure comparisons, not permission to remove unfamiliar parts. Confirm your model, installation and manual revision. Cleaning residue, resin treatment and system sanitizing have separate instructions; do not add a disinfectant recipe to these steps.
How to clean a water softener brine tank
1. Isolate the equipment as instructed
Use the bypass and any additional isolation or power instructions specified for your model before disconnecting components. Do not assume bypass alone depressurizes every connection. Culligan advises against improvising a full disconnection from household plumbing; its troubleshooting guidance recommends bypass and professional support when the unit needs to be taken offline. Never force a stuck valve. [1]
2. Remove salt and brine using the approved method
Deal with hardened salt according to the bridge-removal instructions first. Whirlpool permits removing loose salt manually or with appropriate wet/dry equipment in its cleaning guide. It also allows clean, dry, separate pellets or crystals to be set aside for reuse. Keep that material apart from dirty salt, sludge, and removed liquid. [3]
Remove material in small loads using equipment suitable for the task. Do not use a household dry-only vacuum to collect brine. Have a disposal plan before filling buckets, and do not return collected sludge to the cleaned tank.
3. Clean the tank and accessible components
Only remove the parts identified in your manual. Some systems have a removable brinewell and float assembly; others include a salt plate. Their fasteners and hose connections are not interchangeable.
For example, Rheem’s guide calls for wiping the tank with a damp cloth. The Culligan HE manual cited below uses a rinse for the tank and a mild soapy solution for the salt plate. These are examples of different approved methods, not instructions to combine them. [2] [4]
Use only products approved for the surface and purpose. Removing residue does not establish that the system has been disinfected. Do not improvise a bleach or vinegar treatment, and never mix cleaning chemicals.
4. Rinse or wipe, then reassemble
Finish the specified rinse or wipe-down so removed residue is not left behind. Replace authorized components in their original positions. Whirlpool’s guide distinguishes newer and older tank arrangements, including how the brinewell seats and how fittings reconnect. Follow the section that matches your unit, rather than forcing a part to match a general illustration. [3]
Pause if a fitting, seal, fastener, or float appears damaged. A clean tank is not ready to refill if its components cannot be secured correctly.
Refill and restart your softener
Use the matching procedure in the comparison above. Record the water quantity or depth, salt type and level, fittings reconnected, and final bypass position. Read the model’s return-to-service instructions before you begin; none of the comparisons establishes a universal “recharge immediately” command.
Check for leaks after reconnecting permitted parts. If the manual calls for a recharge or other startup check, follow that sequence and record completion before testing performance. See the salt-level guide for refill records.
Brine-tank cleaning checklist
Complete the plan before starting. Leave a task marked not completed if you cannot do it safely; use the matching manual instead of combining methods.
Open the fill-in record and download a copy
Use “unknown” for details you cannot confirm. Entries stay in this page and are not submitted by this tool. Download a text copy before leaving; reloading clears the record.
No record prepared yet.
JavaScript is off. Copy the field labels into your own notes and keep your record there. The download buttons require JavaScript.
What to check afterward
Watch for leaks at any connections disturbed during the work. Confirm that covers and components are secure and that the bypass is returned to the correct service position when instructed.
Check treatment performance as well. Rheem’s operational guidance includes bypass, programming, flow registration, and hardness testing after its prescribed recharge. Use a treated-water faucet and follow the test kit’s instructions. Record the result and units; water feel alone does not confirm recovery. [5]
Keep a brief maintenance note: date, reason for cleaning, material found, parts removed, refill guidance followed, and any follow-up result. If the original symptom remains, use that record for further diagnosis instead of repeating the cleanout.
When to leave the cleaning to a professional
Arrange help when the tank cannot be handled safely, the correct procedure is unavailable, or fittings and internal components require work you are not equipped to perform. Persistent high water, a leak, or an unresolved fault also needs diagnosis.
Suspected contamination is a separate issue from ordinary salt residue. The cited Culligan manual distinguishes tank cleaning from sanitization and directs owners to seek appropriate service after water contamination. A wipe-down is not evidence that water is safe to use. [4]
Sources and model-specific instructions
Manufacturer documentation checked September 24, 2026. Your model’s manual takes priority over this general overview.
- Culligan: Water softener troubleshooting
- Rheem: How to Clean the Salt Tank and Brinewell
- Whirlpool: How to Clean the Salt Tank and Brinewell
- Culligan HE owner’s guide: Care & Cleaning (PDF)
- Rheem: Checking softener operation
Updated October 27, 2026: added a fill-in brine-tank cleaning checklist with a downloadable text copy. Manufacturer-based guidance is not a report of hands-on testing.